Prepping for Tinkering Sew Camp at ReDiscover


Right now I am basking in the glow of my very own window display, a la Mary Beth.


On Monday, July 22nd it will be my turn to lead one week of tinkering sewing camp. I am very excited about  the week.

I  have been  thinking about my week since February. Of course, I didn't finish the prototype skirt until 2:00 pm today, Tuesday, 6 days before camp start. Six months, six days what's the difference? Yes, I crammed in college and graduate school and for every class I have taken since. enough about me.

My campers will start each morning drawing colorful pictures resulting from a daily design challenge. You want specifics this early? Really?

Day 1 will be about hand sewing, perhaps  a running stitch for those ubiquitous Yo-Yos. Yes, a running stitch, but I am all about sewing buttons, because one can use this skill for as long as one has steady hands, and decent eyesight and willing to admit to knowing how to sew on a button, whether its flat or shank. No, no, enough  sewing jargon, because the real fun is playing with the stash of buttons. I stocked up on awesome buttons from Rimmon Fabrics. Each camper will pick 12 because we are making button clocks. .  Did I mention these will be operational clocks. Do you know how many kids no longer understand the phrase, " half past 10", or " a quarter to 11"?  I am doing my part to keep the non-digital clock alive.

Anyway, the  difficult prep for the button clock was tearing apart the $1.99 Ikea clocks for reuse. We will reuse all of the pieces in various ways, I promise! Moving on, the challenge for me was convincing my husband, lets call him the legal naysayer, that I am competent to use a Dremel  to separate the plastic parts of the clock....he reluctantly obliged. I believe  it took so long to do one, there was no way he was going to create one clock for each enrolled camper!!! So, I am now an expert with a Dremel. The plastic is done, other supplies: embroidery hoops, check;  canvas for clock face, check; clock parts, check;   buttons, check; sewing needles, check; thread, check;  AA batteries, check;  all in a handy self-made tote, check. check out the prototype in the window.This  project is ready for camp! One  down, more to do.

Next we start cutting into very large men's shirts to reuse as summer dresses...NowI am getting the hang of what ReDiscover is all about. See the before and after in the pic??? I went hunting for this shirt one Saturday. I went to Macy's and told myself to purchase the cheapest long sleeved XXL mens shirt that  I find.   The winner was $4.99. It's great because it is huge, it is cotton, it has snaps, one teensy glitch, it is  embroidered, not iron-on patches,  but machine-embroidered  crosses on each shoulder, that were huge...uggggh. But, I bought it, because I knew I wouldn't find anything cheaper, with tax it was a little over 5 bucks. Darned am I proud of my cute summer halter dress. It just needed some Rick-rack and some appliqués and whooooosh...check it out in the window pic!

Okay, so now we need another skill that will be great to know. Sewing a zipper is a good one. kids have no fear..I want them to do zippers without flinching, because most of the adults I know turn purple at the thought of sewing in a zipper, or making a buttonhole ( enough about my generation, it is all about youth)!  Zipper  pouches are always a hit. ! Of course, I stocked up on zippers at my favorite place, Rimmon Fabrics. I grabbed an old Sears upholstery sample binder that had been donated to ReDiscover. I don't know about you, but when did Sears do custom upholstery? Actually, much to my surprise after a healthy machine washing, the fabric pieces are okay, they will make perfect  make-up bags, pencil/ pen bags, whatever the campers decide their purpose to be. Sure beats being in a Sears catalogue, right???

The last major project mixes today's technology ( electroluminescent wire ) with good old fashion electric sewing machinery. Create a garment and attach EL wire for an awesome runway finale..which is exactly where you will find me at 2:30 next Friday. I hope to see you there!!!


Teach Another Generation: A Bumpy Ride

Teen Sewing Camp January 2013


I love to teach kids how to sew; it is more like guiding them on their journey.

Yes, I am older than my students. I am wiser, well, I am more knowledgeable about using a sewing machine and constructing basic sewing projects. For example,  I can insert a bobbin and change a broken machine needle. I can construct a  9-patch pillow, a zipper bag, and a  reversible jean bag.

But it is the knowledge that comes with experience that I relish. I know the end score--A WIN. I know because they are constructing their own unique product. In and of itself, it is a success of which to be proud--an accomplishment that they can feel, touch and share with others.

Yes, I know the outcome, hooray; and I know the ride can be a bumpy one. Remember, I also know the end.

For instance, I feel their elation of selecting fabric for a project. I love this initial high, and I love watching this process vicariously. I am a lucky lady.

But, I know there comes a time in most every project a sewer undertakes for the first time. Typically, the event occurs when the sewer understands the instructions different from what the words and pictures are showing the sewer (need I say more).The frustration ensues, it starts to erupt and comes in many forms and the disconnects can be infuriating like sewing the wrong pieces together  or daunting like cutting your, especially for you, fabric wrong!

This is where the art of teaching sewing gets real, it is the test of my skills as a true believer that everyone can be successful at sewing. Sewing the wrong pieces can be fixed with the right tools (seam ripper), time and patience. The wrong cut takes a little more creativity; it is a greater test of my ability. I explore their reactions to a redesign: (a) introduce new fabric, (b) add an embellishment (c) create a new version of the initial project . There is always a solution, the test is finding the best one , the participant-approved one and quickly. I will use of any fabric, trim or machine sewing skill I know that can be offered as a salvation.  Ususally, I get a thumbs up for one or more of the solutions.  Hey, I am a great salesperson, when I have faith!

So, the construction process continues, and I take a breath and continue along for the ride, but it is over too soon, and, yet, the end is magical.  I see their beaming smiles; they are overcome with joy.There  is nothing better than pride in one's own ability to create.

This post is inspired by many students, most recently, the participants of the Teen Sewing Camp at the Road to California Quilters Conference & Showcase. The campers are shown in the picture  at the top of this post. 


But I am the lucky one; I will get the experience again in March at the 34th Annual Glendale Quilt Show.

Teen Quilt Camp March 2012


These pictures don't begin to recreate the joy of the journey! But, I hope you enjoyed the ride!

Now I think I will go buy some fabric for my sewing studio gotta love that feeling.

Susan


The Stitching Baker


As my moniker shows, the sewing machine is a comfy place for me.  I love to sew, and stitch as well.  I have a few completed projects to share with you.

In the photo above, you will see my Punch Needle Embroidery, it's a great medium.  It is relatively simple, it just requires a little patience.  I have had this kit for a few years, and finally got it framed to display this year.  I love this, it feels so old fashioned.

Then I thought I would make some little holiday pillows.  I love little pillows that hang on door knobs.  I didn't make this one, but I love it!


But these I did make.  A little Ho Ho Ho!


And this one is Naughty one side, Nice on the other.


This pillow was actually a tote bag that my mom was given from her grade school.  She really wanted it in a pillow so I made this little one, I love the white pom pons with the elementary theme!


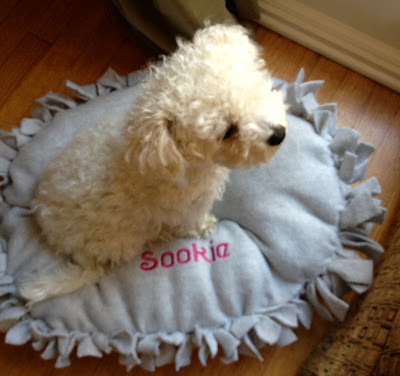
Finally, I have been looking for a dog bed for Sookie, the one-eyed Bichon.  Dog beds are ugly.  If you don't go for a rustic plaid for a hunting dog, then you get these cheesey pink and black diva dog beds.  I am not a fan.  Plus, they are ridiculously expensive.  So, I knew Sookie likes to cuddle on our pillows, so I emulated that effect.  This is the simplest of all designs, no sew at all!  But it was cheap, like $3 for the fabric, and a few bucks worth of poly fill.  When it is dirty, it goes to the trash.  And, I can make more for other rooms.  She loves this little bed!  Especially when that winter sun comes through that window.  I can always find her chasing the sunshine.


I have more in the pipeline, but for now, what are you waiting for?  Get in there and craft!